Saturday, April 18, 2015

Blueberry Pancake

One eats a lot of eggs on the Whole30. Which is fine for the first... Five days and then I am simply over it. I loved my oatmeal with butter, raisins, and a splash of maple syrup in the mornings, but I haven't had oatmeal in 27 days! I can't believe it's already been 27 days.

Anyway, the weekend is the time for me to explore new breakfasts and be a little more relaxed. During the week I usually fry up two eggs, have some sausage, and some fruit. I try and do different things on the weekends to mix up the breakfast routine.

So today I made this:


A blueberry egg pancake. It was delicious and tasted so much different than eggs. With the addition to cinnamon (yum!) and the blueberries, it totally rocked my world. It's simple, quick, and probably something I will make during the week as well. I need quick, easy, and satisfying during the week. 


The whole process took me about 6-7 minutes to do and the clean up was the bowl used for whipping the eggs, plate for the end result, and the fork and spatula. We use cast iron skillets in our house, and luckily the skillet I use is so nicely seasoned it hardly leaves traces of anything on it.


I am not the best flipper of eggs in the world, but luckily this process was pretty easy. I used a tiny skillet as I was only doing two eggs and coconut oil seems to work the best when trying to flip food.


I am so grateful for all the resources out there for Whole30 recipes. And since this is my second time doing it, I am more comfortable with knowing what I can eat that it makes me do a bit more exploring. I often times take someone's recipe and alter it to my tastes. As long as I have the basics down, I add or subtract certain ingredients depending on what I am feeling. 

I hope you enjoy this as much as we did. Next time I am going to make it with four eggs, as two just didn't seem enough. I imagine this would be good with blackberries and strawberries too!

Blueberry Egg Pancake

2 eggs (or 4 depending on how hungry you are)
1-2 tsp of cinnamon (I used more cause I live cinnamon)
1-2 tsp of black pepper 
A small spoonful of coconut oil
A handful of blueberries (or diced strawberries or blackberries)

In a small skillet (I used an 8 inch cast iron) add the coconut oil and let get warm on medium heat.

While the coconut oil is melting, whisk the eggs, cinnamon, and black pepper together to make an omelet like consistency.

Once pan is nice and warm, pout egg mixture into skillet. Keep an eye on the eggs as you don't want to cook them too fast. When the eggs become baked on the bottom with a bit of uncooked egg on top, (about 2-3 min depending on how your oven is) add the blueberries. 

Carefully flip the eggs onto the next side and let cook for another minute or two.

Grab a plate and flip the pancake, blueberry side facing, onto it. 

Grab a fork, a cup of tea or coffee, and enjoy!


Tuesday, April 14, 2015

Whole30 Life


Last year was a hard for me personally. I lost someone so very important to me that it wrecked my world. I had never lost someone close to me before and so it was all new experience for me. I started going to therapy on a bi-weekly basis (and still do) to help me crawl out of the depression hole that I was in. When I get depressed, I don’t want to do anything—I want to lie on my couch, eat cookies, and watch grey’s anatomy on repeat on Netflix. Seriously. I’ve seen every episode at least 15 times. As soon as it ends on Netflix with the last available episode, I start all over again. More importantly, the reason why is because my person and I used to watch it together when she lived here in Flagstaff. And it was her mom that died, my second mom—it was a way for me to feel connected with her when she wasn’t here.

Because I was in a depressive state and was having a hard time coping, my weight ballooned, and I got to be the heaviest I had been in two or three years. Starting in 2011, I made a drastic shift in my eating habits to break away from my weight. When I graduated from Grad School in May 2011, I weighed close to 200 pounds. I’ve always been a bigger girl—I have these amazing German hips that I do love, but when all your friends are a size of a pencil, it’s sometimes really hard to not get upset about how big you are (especially in high school and college when you’re so incredibly insecure). Anyway, at the end of 2011, I started paying closer attention with what I was eating and putting in my mouth. I wasn’t necessarily eliminating anything, but I was making a conscious ever to not eat so much, not eat so much crap, and try and eat organic 90% of the time. Once I started doing this in the summer after I graduated, the weight started coming off. I got down to about 165, which is the smallest I’ve ever been probably since grade or middle school. I maintained that weight pretty regularly and of course fluctuated here are there, but I never got above 170 or below 157. When Nan died in March, in April I was 185. I was a bridesmaid in one of my best friend’s wedding, and I couldn’t fit into my bridesmaid dress. Or any of my clothes comfortably anymore.

A co-worker came into my office in May of last year (2014) and told me she was doing this thing called “The Whole30.” It was her third week and she was feeling great and free from the sugar demons or needing to stuff her face with food at every meal. I looked into it and wasn’t really sure if I could do it (I have one of the biggest sweet tooth’s) so I pushed it off for a few weeks.

The week after my birthday, I decided I was going to take on this program. I was only going to do 18 or 19 days, because we were going to be traveling to a wedding and I just wanted/needed to lose some of the weight to fit into my bridesmaid dress. The first week I started was hard. I work in an office, and it’s so easy to just mindlessly nibble on food throughout the whole day without paying much attention to it. So, I made a very hard and challenging transition to only eating meal 1, meal 2, and meal 3 within 5-6 hours of each other. Within the first 7 days, I noticed a dramatic shift in my weight—my pants were surprisingly looser, it was easier to ride my bike, and my stomach bloat went away almost immediately.

You’re not supposed to weight yourself or take measurements throughout your Whole30, because the scale doesn’t really matter when it comes to fitness. And they want to break you from making what the number on the scale effect your day (cause you know it does). I did weight myself before we left for Boston, about 15 days into the Whole30, since I knew I was most likely gonna stray from the program while I was there (my friend married into a Greek family and they made baklava, which is one of my biggest weaknesses). I had lost 17 pounds in a little over two weeks!

When we were in Boston and since that May, I’ve pretty much kept to some of the rules of Whole30. For example, I don’t eat beans anymore because they wreak havoc on my system, which is huge because I love me some bean tostadas, but they hurt my stomach so bad and cause so much bloat that I don’t want to experience that again. But, I did incorporate sweets back in, my gluten-free goodies on this site, and the like.

I did gain some of the weight back, but have been a steady 170-175. So, 23 days ago, I started to do the entire Whole30 program! It’s amazing that I only have 7 more days to go! I can tell this time around that I am losing weight and inches around my body. My waist hasn’t been tinier and my stomach is incredible flat. But not only that, I feel AMAZING. I am happy and cheery and laughing; I am getting some great sleep; and I feel totally satisfied with what I am eating I don’t have the need to go and snack on anything. I do have to admit though, I miss my oatmeal and raisins in the morning. And the occasional sweet treat, but I know that as soon as I start incorporating sweets back into my diet, I won’t be able to stop. So, I am going to extend my Whole30 for an extra ten days. And if I still feel the sugar demon inside me, I’ll do it for another 10 days. The Whole30 isn’t a diet, it’s a lifestyle change—it changes how you think of food, what food you eat to nourish your body to its fullest potential, and makes you really pay attention with what you’re putting in your body.

Let me tell you, sugar is in EVERYTHING. It’s hard to find ketchup, or chicken broth, or tomato puree that doesn’t have sugar in it.

My Whole30 ends on the 21st, and I will be out of town for a meeting. So Sunday I plan on cooking breakfast, lunches, and dinners for me to pack with me to take out of town. I leave the 20th and come back the evening of the 22nd, and since I’ll already been at day 31 by the time I get back, might as well keep going, right?

The thing I like about the program is that the first week or two sucks hard as your body is getting rid of all the shit you’ve put into it. Sugar withdrawals are serious and can be so overwhelming. I was a cranky you-know-what that first week. But as soon as you pass that hurdle, it’s easy, it’s fun, and it’s exciting. My partner and I rode our bikes this weekend for 13 miles! And it was easy! I haven’t ridden my bike in about 10 months, so I was expecting it to be hard, but it wasn’t! And I was smiling the entire time while riding my bike. It’s like an instant smile has been plastered on my face.

Thankfully, I am not alone in the Whole30 world, and the internet is here because there are so many ways to connect with people who are also doing the program. Instagram, Pinterest, Facebook, and general Google searches bring up loads of information. Especially recipes, because it can be hard to eat the same thing over and over again for 30 days. There’s a supportive community as we help each other push through the process and give our understanding and encouragement for people. It really is amazing.

I highly encourage this program. It isn’t a diet, it isn’t a “fad.” The creators are nutritional scientists and have a book called “It Starts With Food” that breaks down how your body processes the foods you put into it. It’s an amazing book and all the people I’ve given it to have understood it completely and can relate to what’s being discussed.

I went on this tangent because I am going to start contributing to the Whole30 recipe world. You may be eliminating certain foods, but the whole foods that are out there are even more amazing than the pre-packaged foods or sweets or crisps. And I hope my recipes show just how delicious things are when you’re on the Whole30.
I may occasionally splurge and make a sweet treat, as my partner has been asking for cookies for the past... 23 days, so I may make some. We'll see. I am not very good with looking at sweets and refraining from eating them, but who knows. Maybe as I get stronger in my Whole30 it will become easier.

Monday, November 17, 2014

Gluten-free baked oatmeal

Let me tell you about my new favourite breakfast. It's delicious, easy to make, has lots of fruits, and is a nice warm comfort food as the days are getting colder and shorter. We had this two times this weekend because it's just really delicious, and I wanted to share with you all this recipe. Meet my gluten-free baked oatmeal:
fresh out of the oven, gluten-free baked oatmeal.
I know it doesn't necessarily look pretty or sexy or anything like that, but sometimes, things are delicious and moist and so unforgettable that a picture just doesn't do it justice. I did try to make it look somewhat presentable, but the thing with baked items that are in a dish, it just doesn't turn out the way you want it to. 
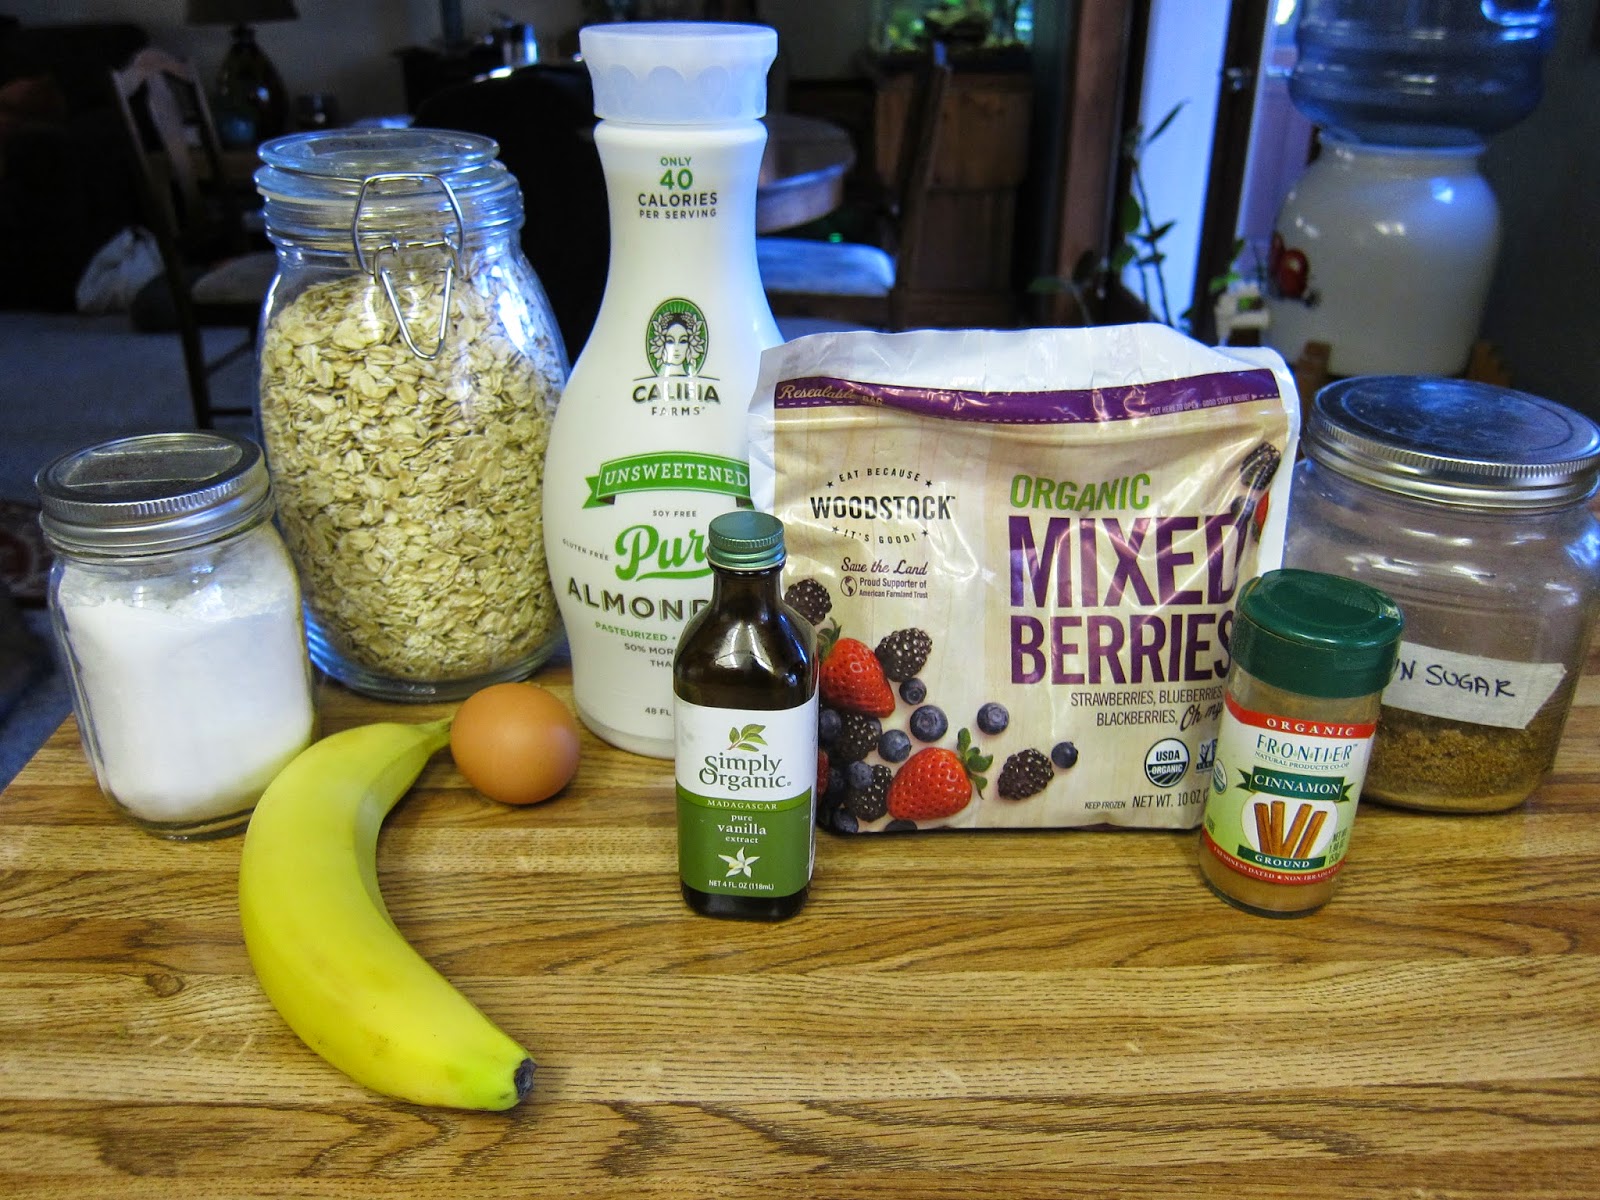
These are all the main ingredients you need! Amazing!
Life has been a little intense for me this year, so I apologize for the lack of posts. I hope to start doing some more soon since I've been experimenting with dishes lately. This dish in particular requires so few ingredients, it doesn't take me more than 10 minutes to whip this dish up. All the ingredients that you need are in this picture above. Look at that. You can even eliminate the banana if you'd like, making it only be 8 ingredients. When was the last time you did baking and only needed 8 ingredients?

All the dry ingredients.
What's nice about this dish is that I choose to only use one bowl. You put the dry ingredients first and mix them up, and then once that's done and you've added the dry ingredients to the baking dish, you can use the same bowl for the wet ingredients. It lessens the amount of dishes to clean, and it is also just easy. I am all about easy recipes these days, especially with the cold weather--I tend to want to hybernate and do less now that it's winter time.
dry ingredients on the bottom and topped with frozen fruit
Berries are not really in season, and even if they were, I would still use frozen berries for this dish. Because they are hard, it allows for the (kind of) long cook time without them exploding or burning. Of course when you cook berries, you for sure want there to be some juicy explosions, but I also enjoy seeing the actual fruit and being able to bite into it, instead of it all being just a jellied mess. 
Wet ingredients all whisked together
I added butter to mine, to add a bit of a richer, creamy flavour. You can add vegan butter if you can't eat real butter, or you could not use any at all, and get the same delicious results. The first time I made this was for a mindful meditation brunch, and we had a lot of people who were lactose intolerant, so I opted to not use any sort of butter or butter replacement and it was all gobbled up.
The final step: pouring wet ingredients onto dry
Besides that this dish is ridiculously delicious, I like how it all comes together and is very changeable. You could add any sort of fruit you want, you can add coconut, dry fruit, nuts, use different types of milk, add chocolate... the options are endless to add twists to this recipe. My partner and I have been enjoying it the same way since I made it the first time (with the addition of butter), and I actually prefer to not have the banana, so I will probably not use bananas unless they are really ripe (we had just bought some bananas and they still had some green on them, and I personally like my bananas to be a bit ripe).
Fresh out of the oven
It isn't the most photogenic thing I've ever made, but don't let that stop you. As I've been baking and cooking, some of the best recipes I've made have looked quite... questionable. However, I also try to have a good attitude and that lovin' feeling when I make food--I think it helps. I think people can taste a difference in food when you know it's being cooked with a good attitude and good feelings. I have also learned that when I am in a bitter mood, my food usually is of lesser quality.
A quick show before it's all consumed.
This will most likely become a weekend regular at my house It does take about 40 minutes to bake, but the aroma that comes from the oven while this is baking is heavenly. This is a great dish to have for brunch or to just have. I've been finding real comfort in oatmeal lately (having it for breakfast every day with raisins, butter, and a wee bit of maple syrup), and this is a nice way to shake up my oatmeal breakfast after eating it the same way for 5 days.  I hope you enjoy this as much as we do in my house!

Ingredients:
2 c. Gluten-free oats
.5 c. Brown sugar
1 tbs. cinnamon
1 tsp. baking powder
1/4 tsp. salt
2 c. Milk of your choosing
1 egg
1 tbs. vanilla extract
3 tbs. butter, melted (or vegan butter)
1 package frozen fruit (I used mixed berry for variety)
1 banana (optional)

Preheat oven to 375. Spray or oil a baking dish. I used both a 9x12 and a 9x7 and I prefer the smaller one--makes the food thicker and not so thin and spread out. It also bakes a bit better.

In a medium mixing bowl, add oats, brown sugar, cinnamon, baking powder, and salt. Whisk thoroughly. Add this mixture to your prepared pan.

In the same bowl (I am all about using as few dishes as possible), mix together the milk, egg, vanilla, and butter. Make sure to whisk this really well to get the egg nicely incorporated into the mixture.

Put the frozen fruit on top of the oat mixture in pan, and slice the banana if using and add to this mix.

Pour the wet ingredients over the oats in an evenly fashion to make sure everything is nicely coated. Let it sit for about 30 seconds to let the wet ingredients seep into the oats.

Bake for 40 minutes and enjoy! This is a huge hit and doesn't last long.


Tuesday, April 22, 2014

Breakfast Chia Seed Pudding

 
I am currently quite obsessed with chia seeds. Have you heard of these delicious things?! If you haven’t, I suggest you start reading up on them soon and start incorporating them into your diet daily. 
 
This breakfast chia seed pudding is delicious and packs you with a ton of important nutrients to start your day. When we first purchased chia seeds, I added them to my yogurt and granola, and I just couldn’t stand it. However, after doing some research and realizing that chia seeds turn into this delicious tapioca consistency when mixed with liquids, I knew it was going to be something I tried to eat every day.
You can do plenty of things with this breakfast chia seed pudding. I particularly like adding the powerful antioxidants of fresh blueberries for an extra boost in the morning. It’s also quite delicious just as it is. It reminds me of vanilla yogurt, but with a tad bit of texture.
 
Breakfast Chia Seed Pudding
Ingredients:
4 tbs. of chia seeds
¾ cup of your choice of milk (I used Oat Milk because that’s what we have, but I am sure regular milk, almond milk, coconut milk, etc. would work great).
1 tsp. of pure vanilla extract
.5 tbs. of maple syrup, agave, honey, or whatever sweetener it is you like (note, I am not sure how much stevia you should put in, so test it out if that’s your go-to sweetener).
Directions:
Mix all ingredients into a mason jar with a lid and shake, shake, shake it! Store in fridge for about 30 minutes and shake, shake, shake it again (sometimes seeds sink to the bottom leaving all the milk on the top, so we want to make sure we continue to shake until it is well combined).
Store in fridge overnight and you’ll have a delicious, nutrient packed to-go breakfast in the morning. Add your favourite nuts, fruit, or shredded coconut to taste.

If you'd like to do this during the day for a mid-day snack, it should take about 3-4 hours to set up. Make sure you look for a tapioca consistency and that the chia seeds are now clear and gelatin.

Wednesday, December 4, 2013

Spicy Peanut Soup

Look at that colour!
 
It has been cold here in good ol' Flagstaff. Thursday's high, for example, is going to be a lovely 28 degrees. THE HIGH. 28 DEGREES. COLD! The wind blew hard all day yesterday, so I knew it was blowing in the storm. It's supposed to snow up to seven inches today, so let's hope it doesn't make the roads too messy.

Not a whole lot of ingredients needed, which is AWESOME!
 
Because it is winter time, I make a lot of soups and chili’s. I mostly do the cooking, which is fine, but also means that sometimes I try new things and they don't really work. I am much pickier than my partner, so he'll eat whatever it is regardless (at least so far), while I will just make myself some cereal and pout. It's what I do when things go wrong, and that's ok.

I really dislike peeling potatoes. But it does make a difference to do so.
 
But this soup, right here, is delicious. And it has a big enough kick on it to make your insides and outsides warm. The creamy sweet potatoes and the creamy peanut butter with a splash of spice is so very, very good. My partner is a... spice junkie. He loves his spicy food (ordering double Thai hot when we go out for our weekly Thai food, and then adding the spice tray to it... he loves hot hot hot), so this to me is really spicy, but I always leave out the hot sauce for him to add a little extra.
 
Cut them up small, as they take less time to cook
 
I have an issue with leftovers. Not really an issue, but just a dislike for leftovers.I don't like to eat the same thing over and over again. I tend to eat whatever I make for dinner one or two more times, and then I am done. I am over it. I don't want to eat it ANYMORE. But this soup is really good. Most of the soups and chili's I make I will eat more than twice, but it has to have turned out EXACTLY the way I want it to, or I just don't eat it. :)

Yes, this really is a hot sauce.
 
Ingredients

1 tablespoon vegetable oil or olive oil
2 cups chopped onions
1 teaspoon salt
2 tablespoons peeled and grated fresh ginger (I used ground ginger, and this works fine every time)
1 hot sauce (more if you like the heat!)
4 cups peeled chopped sweet potatoes (about 1 1⁄2 pounds whole)
3 cups water
3 cups tomato juice or Veggie juice--either work fine
1 cup smooth peanut butter

Warm the oil in a covered soup pot on medium heat.

Add the onions, salt and cook, stirring frequently, until the onions are translucent.

Stir in the ginger and hot sauce or hot pepper.

Add the sweet potatoes and water and stir well. Bring to a boil, cover, and simmer until the vegetables are very tender. Add the tomato juice and peanut butter to the pot. Using an immersion blender, purée the soup until smooth.

Add more salt and hot sauce to taste.

Tuesday, July 23, 2013

Puffed Millet Peanut Butter Balls

Finished product. One with chocolate, one without. Both delicious.
These guys are freaking delicious. There are no words to really describe how awesome these are. They taste exactly like a Reese's Peanut Butter Cup, but without all the crap. With only 5 ingredients, they are really quick to whip up and enjoy within 20 minutes of starting. It's awesome. 
 
Puffed Millet
Peanut Butterrrrr


I made these because we were headed to Phoenix for awhile so that my partner could get costume fitted, as well as learn some choreography for a movie. Yes, a movie! He will be fencing in a movie that a woman is putting on for film school. Since we follow a pretty strict diet, and we were unsure how long we were going to be in Phoenix, I decided to make as many things that could be easily transferred and eaten on the road. These were the perfect little treats, packed full of energy with the millet and the peanut butter

yummy.

Just look at that creamy yummy texture! You do have to chill the "dough" before you try and roll it into balls, but that doesn't take long. 5-10 minutes maybe. And then you roll them up and they are ready to eat, unless you put some chocolate on them, then they need a little more chilling before you dip them. I highly recommend doing a 50/50 mix of chocolate and non-chocolate. At least the first time, and then you'll know which ones you like better.

Puffed Millet Peanut Butter Balls!

I also really enjoyed the lack of clean-up needed making these. I used one bowl (with the exception of the one used for melting chocolate), and they whipped up so fast. As a baker, I know that patience is needed to make some awesome stuff. And I suppose this isn't really "baking," but "making." It was just nice to have a homemade sweet treat so quickly and so mess free. Usually when I bake, things go flying everywhere and I get really messy.


The chocolate dipped ones remind me so much of Reeses PB cups
I really dislike rolling things out. So maybe you have a kid or a partner, or someone who enjoys making balls that are actually bite size. I start off with the best intentions of making bite-sized balls to easily pop in your mouth while driving, but I get so annoyed with rolling things out that I tend to start small and get larger each time. It's kind of like making pancakes--you start off making normal sized pancakes, and then towards the end, you make one GIANT pancake cause you're just over it. Or at least I am, and that's what I do. These balls are exactly the same way. I started off small, but then just go so bored that I made them larger than bite size. At least for me--I have a tiny mouth so it required two or three bites, but my partner just popped them in his mouth with no sweat.
 
Look at that delicious-ness!

Puffed Millet Peanut Butter Balls
Makes 20-32+ balls (depending on size)

2 c. puffed millet
1 c. peanut butter (I used half creamy and half crunchy since that's all I had)
4-6 tbs. agave (depending on how much you want them sweet)
2 tsp. vanilla extract

Chocolate coating:
Handful of dark chocolate
1tbs. coconut oil

Place peanut butter in a microwaveable measuring cup and warm for 45 seconds. Once a bit more creamy and melted, add to bowl with agave and vanilla. Mix thoroughly. Add the puffed millet and stir until millet is coated with peanut butter mixture thoroughly.

Once everything is combined well, roll into bite sized balls. Place on a baking sheet, lined with parchment paper and stick in fridge to set up. About 10 minutes.

If adding chocolate coating, take a handful of dark chocolate chips and the coconut oil and place in a microwave safe bowl. Heat for 1 minute and stir until all the chocolate chips have melted. Pick up the puffed millet peanut butter balls and dip one side in the chocolate, and place back on the parchment paper. Do this for as many chocolate ones you desire. If you want, stick in the fridge, let set up again, and then do another round of dipping of chocolate. Once completed, put in the fridge for another 5-10 minutes, then enjoy!

Keep these refridgerated since the chocolate tends to melt and things start to get mushy when they are left out. I kept mine in a zip loc bag, but feel free to use any airtight container that works best for you.

Monday, July 1, 2013

Gluten-free, vegan, peach pie and crust

The final product! Looks, smells, and tastes delicious!
Gluten-free baking is a tricky, tricky, thing. Flours taste weird, things don't rise like they do with normal all purpose flour, sometimes it is really dense, and sometimes it turns out just right, like this pie and pie crust.

millions of peaches, peaches fo me!
I have been figuring out pie crusts for almost a year. I made a ton of pies last year with fresh pumpkin from our garden, preparing for Thanksgiving and wanting it to be perfect. The pie crust I used was ok. It tasted gluten-free and I didn't really enjoy it. It was a weird consistency and it was so funky. So, I gave pie making a rest until I saw rhubarb at the store and realized I had never had rhubarb, and more specifically, a strawberry rhubarb pie before. So I was set on a mission to create the perfect pie crust for this delicious sounding pie.

dry ingredients for the pie crust. 
The first time I made the pie, I did make a strawberry rhubarb pie. The crust was a bust. I added too much liquid, which made me add more flour to try and balance it out. I ended up having a TON of pie crust, and it came out super thick. I don't really like thick crusts... I would prefer a nice little layer of crust and mostly fillings with my pies. So, while it tasted good, I ended up mostly eating just the filling of the strawberry rhubarb pie. My partner loved it and ate it all.
Finally a good gf, vegan pie crust!
The second time I made a pie, I made it with apricots and the pie crust, after paying more attention, turned out perfect. I didn't make so much and I also made it thin enough that when I held up the pie pan to the light, I could see the light through it. Not like there were holes, but the crust was thin enough that I could see that there was a light on.

peaches cooking down, releasing their delicious juices!
So, of course, I had to make another pie to make it even better. I am really into pies lately. I especially like this pie because, well, it's pretty darn healthy for you. The replacement of coconut sugar is so much better than plain ol' granulated sugar. So my project was a peach pie, because oh my goodness, the peaches look heavenly.

sweet crust drops
This pie crust isn't all that sweet, so I added a little sweet crust drops on top of the pie. This was like what you'd put on top of a crisp. But, it wasn't filled with oats. It was the perfect sweet top to add to the tart strawberry rhubarb filling.

close up of the topping on the pie before baking.
I hope you enjoy this pie crust as much as I do. It really is my new go to pie crust. And it takes minutes to put it together.

Gluten-free, Vegan Pie Crust
Serving: 1 9-inch pie dish

1 1/2 c. brown rice flour
1 tbs. arrow root
3/4 tsp. salt
1 tsp. coconut sugar
1/4 tsp. cinnamon
1/2 c. refined coconut oil, solid
1 1/2 tbs. vanilla extract
3 tbs. agave nectar
6 tbs. water

In a bowl, combine dry ingredients. With the mixer on low, gradually add in coconut oil a tablespoon at a time. Once the mix is crumbly, add in vanilla, coconut nectar and slowly add in water a tablespoon at a time until the dough all comes together and forms a ball.

Remove from bowl and form into a ball shape and flatten into a disk. Oil  bottom of pie plate, place disk into pie plate, using either the heel of your hand or pastry roller, press out into the bottom and sides of the plate; then use your hands to form crust and crimp edges. With a fork poke a few holes in the bottom of the crust. 

Preheat oven to 350°*. Place crust in freezer until it hardens up (usually about 15 minutes).

Bake for 5-6 minutes.

Pie Filling

5-6 peaches
1/4 c. coconut oil (solid)
6 tbs. coconut sugar
1 tbs. vanilla extract
2 tbs. arrowroot
1tbs. water

Place filling ingredients, excluding the arrowroot/water in a pot over medium heat, stirring frequently. After the peaches have cooked down, mixed together the arrowroot and water to form a slurry.

Pour arrowroot/water mixture into the peaches. Keep on the heat and stir until the mixture thickens (you'll be able to feel it, so keep stirring and mak sure it is evently combined and thickened.

Pour into pie crust.

Topping

1/4 c. coconut sugar
1/4 c. brown rice flour
2 tbs. coconut oil

Using a fork, mix together ingredients until they form a crumb like consistence. Place spread out on pie before baking.

Bake pie for 30 minutes. Let cool before placing in fridge. If you don't have enough patience as me, place pie in the freezer to help speed along the setting up of pie.

Enjoy at room temperature, or heated with a dollop of ice cream.

* I baked my pie in our grill (because it was 9.30 IN THE MORNING and it was already over 85 degrees in the house), which is like a conventional oven. Infrared is what they call it I think. I ended up baking it about 10 minutes shorter than I would have in the oven because it started to boil it over. So I just transfered it to the oven in the house and let it heat up the oven and continue to bake for the remainder minutes. I have to admit that I was a little nervous that it would taste like chicken since that's what we grill, but it doesn't. It tastes like peach pie and it is freakin' delicious. 

The oven for the pie. aka. the grill!
Pie siting on the grill